Speed Up Document Review with Custom Highlights

Minimizing document review cost is a priority for most firms and clients. Reducing cost comes down to reducing hours, or even minutes, of review time. In Everlaw’s litigation platform, every feature is designed to allow you to get things done faster.
One way to do this is with Everlaw’s highlighting tools. They allow you to quickly identify useful terms across your document set. There are three types of highlights:
Search: Highlights the terms that you’ve searched for. This type of highlight shows you why each document is in your search results by identifying the terms that made it responsive to the search.
Persistent: Highlights the term in all documents in your case, for all users. This type of global highlight (set up by admins) makes it easy to redact privileged information, identify patterns, and ensure intra-reviewer consistency.
Custom: Highlights a term within the document you’re currently viewing, just for you. This type of local highlight helps ensure you don’t miss an instance during review.
Today, we are putting the spotlight on custom highlights.
What Are Custom Highlights?
Custom highlights are a convenient way to search for a term in an individual document. They can help you find contingent, important information for that document and take action on that information. Unlike persistent highlights, a custom highlight can be created by any user on the case. Like persistent highlights, you can have multiple custom highlights for each document and, if you pin a custom highlight, you will be able to view that highlight throughout your documents. These will not be seen by others who view those same documents.
Why Do You Need Custom Highlights?
They allow you to find every single instance of a term in your document, without intensive manual searching or fear of missing one.
They make it easy to redact all occurrences of a word or phrase in a document, so you can keep confidential or privileged information protected.
They allow you to quickly jump to the important information in long documents.
How Do You Set Up Custom Highlights?
You can set up custom highlights in a specific document from the review window. Go to any document. Then:
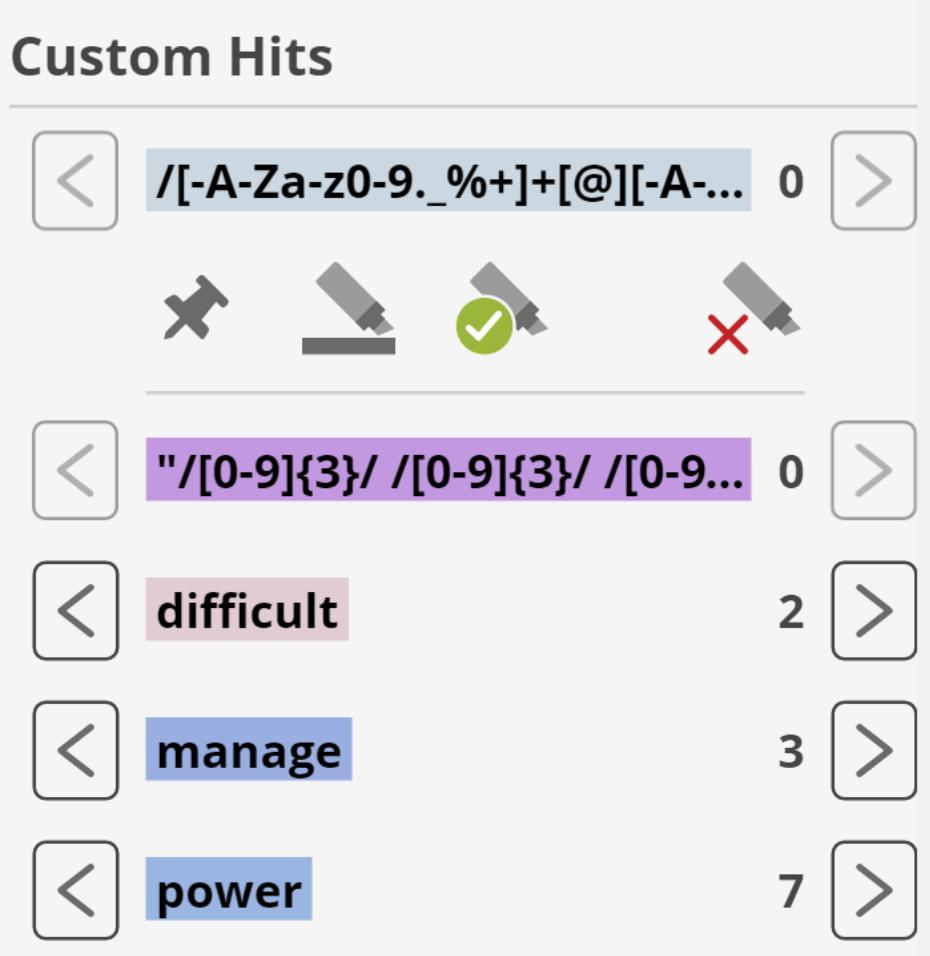
On the right side of the review window, find the header that says “Custom Hits,” underneath the “All Hits” heading.
Click into the box or field that says “Search Document,” and then type in the word or phrase that you want to locate within the document.
Common patterns, such as social security numbers or phone numbers, will automatically appear in the drop-down menu as options.
You can also use advanced search syntax, such as fuzzy, wildcard, or proximity search.
Press Enter. You will now see a new line with your selected term under “Custom Hits” and the term will be highlighted throughout the document.
To apply your custom highlight to the other documents in your case, you can “pin” that highlight. Click the custom hit, which reveals a pin icon. When you pin the hit, the pin icon changes from light grey to dark grey. If you don’t pin a custom highlight, then it will be removed when you navigate to the next document. To unpin a custom highlight, click the pin icon again so that it’s no longer bolded.

You can also perform redactions on custom highlights by clicking the redact icon underneath your term. You can either redact the one instance of a term that you have selected, or all instances of that word or phrase in the document.
When entering multiple custom highlights, they will be highlighted in different colors – both throughout the document and in the key in the right panel. Color bands representing the highlights will also appear in the document jump bar (in text and image views). The jump bar is a navigation tool which allows you to jump from one page to another within the document.
Any questions? Let us know at feedback@everlaw.com, or review the detailed documentation within the Everlaw platform. You can also check up on past feature deep dives here.